by Fernando Sanchez
It is no surprise on how much raw data we are producing today. As data accumulates and builds up, so do the processes, ultimately making our environment difficult to manage and prone to failures.
One of the biggest challenges in an environment when changes are occurring all the time, is finding the process(s) that have failed and affected downstream processes. Troubleshooting and handling these errors can be somewhat tedious and time consuming, but most importantly, it can impact our workload.
If you are working hard to manage a SQL Service Integration Services (SSIS) environment, it’s only natural to look for ways to improve and stabilize your environment.
Solving Real-World Challenges
For many of us working with SSIS, scaling the system up can be another challenge. As the number of databases and tables grows, so does the number of SSIS packages. Managing an environment with hundreds of SSIS packages can be a nightmare—but it doesn’t have to be. With a little effort, you can learn to master your environment!
If you’ve built and deployed data integration solutions using SSIS in the past, you’ll know it requires hours of effort to define and configure the various SSIS Tasks and Components in a package.
Other than the use of variables, expressions, and custom scripts, there is not much we can do once a package is created; but what if I told you there is a third-party extension that allows the data flow components to be dynamically configured at run-time without sacrificing performance? Most importantly, it saves hours of development effort and reduces complexity and package failures.
More Features Than Standard Data Flow Task
The Data Flow Task Plus by COZYROC is an extension of the standard Data Flow Task and it was first introduced in January 2008 as part of the release 1.2 SSIS+ Suite. Unlike any other control flow task on the market, it is unique and can be used with any tasks and components included in Microsoft’s SSIS library and COZYROC’s SSIS+ Suite.
What makes this extension different from the standard Data Flow Task that comes with SSIS? With the standard Data Flow Task, it relies on static metadata for column mappings. This metadata is defined and captured when the package is first designed and developed. Thus, the column mapping remains unchanged until the package is manually opened and modified. Every time a new column is introduced, or an existing column is modified at the source or destination, the current package requires updating.
Just imagine, if you have hundreds of critical packages in production that require updating, the modification of these packages would be tedious and cost hours of maintenance time.
COZYROC’s Data Flow Task Plus completely eliminates this tedious demand. During the design and development of the package, all columns are removed and replaced with one column called the THUNK_COLUMN. At run-time, the columns are then dynamically mapped from the source-to-destination. If the column names do not match or are missing, the COZYROC’S Data Flow Task Plus ignores them and continues with execution and mapping whatever columns do exist. Ultimately, using this method prevents errors that would normally cause the package to fail. Unlike the typical Data Flow Task, this extension saves hours of time and money.
How-To Create a Simple Package Using COZYROC’S Data Flow Task Plus
This article is the first in a three-part series. In this first part, I will show you step-by-step instructions on How-To create a simple package that dynamically maps the source and destination columns at run-time using COZYROC’S Data Flow Task Plus. We will use the OLE DB Source component in the Data Flow to read the data from a local AdventureWorks2016CTP3 database and write it to a different table in another database using the OLE DB Destination component. In the second part of the three-part series, I will show how we can further make the package dynamic using variables and expressions. Finally, I will wrap up the three-part series by showing how we can use metadata tables to replace the values of the variables at run-time and load several tables.
In order to complete this package, you will need to first download and install the COZYROC SSIS+ Suite from Here. Don’t worry. There is no need to purchase. The COZYROC SSIS+ Suite is free for evaluation and development in Visual Studio. However, if you plan to test and execute the package from the MS SQL Job Agent, you can use the 30 day trial license. This is easily done by entering the word TRIAL for the License Identifier in the License Application.

Figure 0 - After requesting License Key from Server
Requirements
In order to complete this task you must have Microsoft SQL Server 2017 Enterprise Edition or Developer Edition, and your computer must have the following minimum requirements:
Operating Systems
- Windows 10 version 1507 or higher: Home, Professional, Education, and Enterprise (LTSC and S are not supported)
- Windows Server 2016: Standard and Datacenter
- Windows 8.1 (with Update 2919355): Core, Professional, and Enterprise
- Windows Server 2012 R2 (with Update 2919355): Essentials, Standard, Datacenter
- Windows 7 SP1 (with latest Windows Updates): Home Premium, Professional, Enterprise, Ultimate
Hardware
- 1.8 GHz or faster processor. Dual-core or better recommended
- 2 GB of RAM; 4 GB of RAM recommended (2.5 GB minimum if running on a virtual machine)
- Hard disk space: up to 130 GB of available space, depending on features installed; typical installations require 20-50 GB of free space.
- Hard disk speed: to improve performance, install Windows and Visual Studio on a solid state drive (SSD).
- Video card that supports a minimum display resolution of 720p (1280 by 720); Visual Studio will work best at a resolution of WXGA (1366 by 768) or higher.
Create Source and Destination Connections
Before we can begin to setup the source and destination components, we will need to create two Connection Managers. Since our source and target is a SQL Server database, we will use OLE DB Connection for both Connection Managers.
- Right-Click in the Connection Manager and Select New OLE DB Connection from the pop-up menu option.
- When the Configure OLE DB Connection Manager dialog appears, Click the New button.
- Once the Connection Manager dialog appears, Type or Select the Server Name.
- Then, Select the Database Name and Test Connection.
- Click the Ok button to create the Source Connection.
- Repeat steps 2 through 5 for the Destination Connection.
- After the Source and Destination Connections have been created, rename them to SQLSourceConn and SQLTargetConn.
Setup Data Flow – OLE DB Source Component
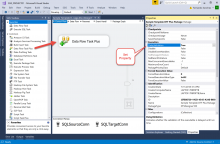
- Drag and drop the Data Flow Task Plus from the SSIS Toolbox to the design surface.
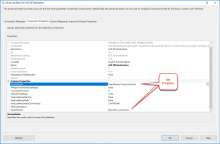
- Before we add the OLE DB Source Component, set the DelayValidation of the Task Properties to True (See Figure-03) by right clicking on the Task and selecting “Properties” from the drop-down menu.
Note: by setting this property to True, we are delaying validation of the task until run-time. Otherwise, errors and warnings will be generated before the package is actually executed.
- Right-Click the OLE DB Source Component to open Show Advanced Editor.
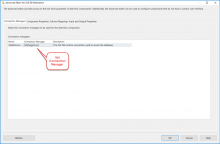
- Select the SQLSourceConn that we created earlier from the OLE DB Connection Manager (See Figure-05).
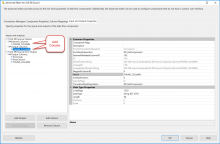
- Click the Component Properties tab. Then Select the SQL Command from the Data Access Mode.
-
Enter the following SQL Statement in the SQL Command Text box (See Figure-06).
SELECT * FROM SALES.CUSTOMER
Note: we are using a SQL query to retrieve data from the OLE DB data source because in the next two articles, I will show how we can use variables and expressions to modify the SQL Query at run-time and make the package more dynamic.
- Click the Input and Output Properties tab.
- Select the External Columns from the Inputs and Outputs box.
- Click the Add Column to add the THUNK_COLUMN.
- Set the Data Type to string [DT_STR] and Length of the Data Type Properties to 50.
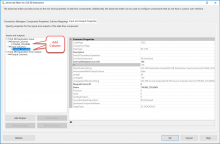
- Repeat the steps for the Output Columns and set the Data Type and Length accordingly (See Figure-07).
Note: to ensure that the component passes validation, the THUNK_COLUMN is added to both Input and Output Properties. The THUNK_COLUMN is used as a dummy column, which is removed at run-time and replaced with the available columns during execution.
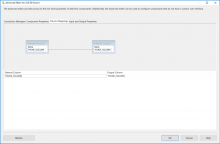
- Click the Column Mapping tab to map the External Column to Output (See Figure-08).
- Click the OK button to accept the changes.
Setup Data Flow – OLE DB Destination Component
- Add the OLE DB Destination Component from the SSIS Toolbox, by dragging the component to the design surface.
- Set the ValidateExternalMetadata property for OLE DB Destination Component to “False” (See Figure-09) by Right-Clicking on the component and selecting “Properties” from the drop-down menu.
- Right-Click the OLE DB Destination Component to open Show Advance Editor.
- Select the SQLTargetConn that we created earlier from the OLE DB Connection Manager (See Figure-10).
- Click the Component Properties tab and Set the AccessMode to OpenRowset Using FastLoad and enter the table name, [dbo].[Src_Customer], in the OpenRowset text box (See Figure-11).
- Click the Input and Output Properties tab.
- Click the Add Column button to add the THUNK_COLUMN to the External Columns (See Figure-12).
Note: make sure the DataType and Length are the same as the Input Columns.
- Click the OK button.
- Click on the Control Flow tab
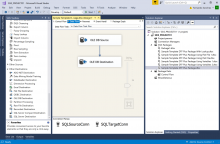
- Drag the connector arrow from OLE DB Source to the OLE DB Destination (See Figure-13).
- Right-Click the OLE DB Destination Component to open Show Advance Editor again.
- Click on the Column Mappings to ensure that the Input Columns and Output Columns are mapped (See Figure-14).
- Click the OK button.
Note: if an error appears because of the mapping, open the editor again in advance mode and review the changes. When you close the editor, the error should have disappeared.
Control Flow – Enable Dynamic
Our last step in setting up the Data Flow Task Plus is to set the component to be processed dynamically. Enabling this property of the component triggers the collections of metadata for the source and destination to be determined at run-time.
- Click the Control Flow tab
- Double-Click the Data Flow Task Plus to open up the editor
- Click the Dynamic tab
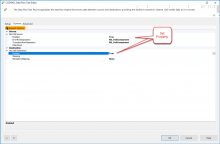
- Expand OLE DB Source and Destination and set Enabled to True
- Click the OK button
- Click File from Menu and Save All.
Summary
In this Quick Start article, I have shown you How-To create an SSIS package using the Data Flow Task Plus that establishes a connection to an OLE DB Source to read the data from a local AdventureWorks2016CTP3 database and at run-time dynamically maps the source and destination columns to write the data to a different table in another database using the OLE DB Destination component.


