Quick Start
In this task, we will show you step-by-step how to create near real-time Account Integration from Salesforce to Zoho CRM using COZYROC's SSIS NoW product.
Prerequisites:
- Installed SSIS Plus
- Installed SSIS NoW
- Accessible SSIS NoW Web Bridge app
- Salesforce account with sufficient access rights to Create/Edit "Callouts" (Webhooks)
- Zoho account
- SalesforceWebhook sample project
- Initially the package and the project are setup with Protection Level to not save sensitive data, so this should be changed accordingly in order to save sensitive data, passwords etc.

- Double click on Data Flow Task, then open Create Zoho Account REST Destination component, select Zoho Connection Manager from Connection drop-down and Account from Resource drop-down.

- Save and build the SalesforceWebhook sample project
- After
<Routing>tag add the following definition.
<Route Path="/salesforce-to-zoho-account" Service="salesforce-to-zoho-account" WaitResult="false" Method="post">
        <RequestBody ServiceParameterName="User::JsonContent" ParameterType="text" />
</Route>
Step 3. Create Salesforce Callout after account is created
- Login into Salesforce account.
- Navigate to "Setup -> Custom Code -> Apex Classes".
- Create new class by selecting "New".
3.1 Paste the following code inside the opened editor.
3.2 Press "Save".
public class Webhook implements HttpCalloutMock {

    public static HttpRequest request;
    public static HttpResponse response;

    public HTTPResponse respond(HTTPRequest req) {
        request = req;
        response = new HttpResponse();
        response.setStatusCode(200);
        return response;
    }

    public static String jsonContent(List<Object> triggerNew, List<Object> triggerOld) {
        String newObjects = '[]';
        if (triggerNew != null) {
            newObjects = JSON.serialize(triggerNew);
        }

        String oldObjects = '[]';
        if (triggerOld != null) {
            oldObjects = JSON.serialize(triggerOld);
        }

        String userId = JSON.serialize(UserInfo.getUserId());

        String content = '{"new": ' + newObjects + ', "old": ' + oldObjects + ', "userId": ' + userId + '}';
        return content;
    }

    @future(callout=true)
    public static void callout(String url, String content) {

        if (Test.isRunningTest()) {
            Test.setMock(HttpCalloutMock.class, new Webhook());
        }

        Http h = new Http();

        HttpRequest req = new HttpRequest();
        req.setEndpoint(url);
        req.setMethod('POST');
        req.setHeader('Content-Type', 'application/json');
        req.setBody(content);

        h.send(req);
    }
}
- Create another class by selecting "New".
4.1 Paste the following code inside the opened editor.
4.2 Replace {{SSIS NoW Web Bridge address}} with the Web Bridge host address.
4.3 Press "Save".
@isTest
public class AfterAccountInsertWebhookTriggerTest {

    static SObject mock(String sobjectName) {
        SObjectType t = Schema.getGlobalDescribe().get(sobjectName);

        SObject o = t.newSobject();

        Map<String, Schema.SObjectField> m = t.getDescribe().fields.getMap();

        for (String fieldName : m.keySet()) {
            DescribeFieldResult f = m.get(fieldName).getDescribe();
            if (!f.isNillable() && f.isCreateable() && !f.isDefaultedOnCreate()) {
                if (f.getType() == DisplayType.Boolean) {
                    o.put(f.getName(), false);
                }
                else if (f.getType() == DisplayType.Currency) {
                    o.put(f.getName(), 0);
                }
                else if (f.getType() == DisplayType.Date) {
                    o.put(f.getName(), Date.today());
                }
                else if (f.getType() == DisplayType.DateTime) {
                    o.put(f.getName(), System.now());
                }
                else if (f.getType() == DisplayType.Double) {
                    o.put(f.getName(), 0.0);
                }
                else if (f.getType() == DisplayType.Email) {
                    o.put(f.getName(), 'foo@foo.com');
                }
                else if (f.getType() == DisplayType.Integer) {
                    o.put(f.getName(), 0);
                }
                else if (f.getType() == DisplayType.Percent) {
                    o.put(f.getName(), 0);
                }
                else if (f.getType() == DisplayType.Phone) {
                    o.put(f.getName(), '555-555-1212');
                }
                else if (f.getType() == DisplayType.String) {
                    o.put(f.getName(), 'TEST');
                }
                else if (f.getType() == DisplayType.TextArea) {
                    o.put(f.getName(), 'TEST');
                }
                else if (f.getType() == DisplayType.Time) {
                    o.put(f.getName(), System.now().time());
                }
                else if (f.getType() == DisplayType.URL) {
                    o.put(f.getName(), 'http://foo.com');
                }
                else if (f.getType() == DisplayType.PickList) {
                    o.put(f.getName(), f.getPicklistValues()[0].getValue());
                }
            }
        }
        return o;
    }

    @isTest static void testTrigger() {
        SObject o = mock('Account');

        Test.startTest();
        insert o;
        update o;
        delete o;
        Test.stopTest();

        System.assertEquals(200, Webhook.response.getStatusCode());
        System.assertEquals('{{SSIS NoW Web Bridge address}}/salesforce-to-zoho-account', Webhook.request.getEndpoint());

        if (Webhook.request != null) {
            Map<String, Object> jsonResponse = (Map<String, Object>) JSON.deserializeUntyped(Webhook.request.getBody());
            System.assertNotEquals(null, jsonResponse.get('userId'));
        }
    }
}
- Navigate to "Objects and Fields -> Object Manager" and select "Account" from the list.
- Navigate to "Triggers" and select "New".
6.1 Delete everything from the editor.
6.2 Paste the following code.
6.3 Replace {{SSIS NoW Web Bridge address}} with the Web Bridge host address.
6.4 Press "Save".
trigger AfterAccountInsertWebhookTrigger on Account (after insert) {

    String url = '{{SSIS NoW Web Bridge address}}/salesforce-to-zoho-account';

    String content = Webhook.jsonContent(Trigger.new, Trigger.old);

    Webhook.callout(url, content);

}
Optional
Step 4. SSIS NoW Web Bridge app is hosted locally behind router
- You have to assure that router's port on which Web Bridge app is listening is forwarded to the host machine internal IP address.
Guide how to forward router's port you can find here
- You have to assure that port which Web Bridge app is using is open in Windows Firewall.
Guide how to open Windows Firewall port you can find here
In this task, we will show you step-by-step how to create near real-time Account Integration from Dynamics CRM to Zoho CRM using COZYROC's SSIS NoW product.
Prerequisites:
- Installed SSIS Plus
- Installed SSIS NoW
- Accessible SSIS NoW Web Bridge app
- Dynamics CRM account with sufficient access rights to Create/Edit Webhooks
- Zoho account
- DynamicsWebhook sample project
Step 1. Setup SSIS NoW configuration
- Open SSIS NoW configuration file, if default is used it is located at "%ALLUSERSPROFILE%\CozyRoc\SSIS NoW\Configurations\default-config.xml".
- After
<Services>tag add the following definition and replace {{Path}} with the actual path where DynamicsWebhook sample project is placed.
<Service Name="dynamics-to-zoho-account" Timeout="120" BatchSize="1024">
    <Package Path="{{Path}}DynamicsToZoho.dtsx" />
    <Inputs>
        <Input ChannelType="Variable" Name="User::JsonContent" />
    </Inputs>
</Service>
- After
<Routing>tag add the following definition.
<Route Path="/dynamics-to-zoho-account" Service="dynamics-to-zoho-account" WaitResult="false" Method="post">
    <RequestBody ServiceParameterName="User::JsonContent" ParameterType="text" />
</Route>
Step 2. Setup DynamicsWebhook sample project
- Open DynamicsWebhook sample project with Visual Studio.
- Initially the package and the project are setup with Protection Level to not save sensitive data, so this should be changed accordingly in order to save sensitive data, passwords etc.

- Open Zoho Connection Manager, select new Token file and follow wizard steps to provide credentials to your Zoho CRM account.

- Verify that connection is successful by pressing Test Connection button.
- Double click on Data Flow Task, then open Dynamics CRM Lookup Transformation JavaScript Transformation component, click on "Parameters tab -> Settings ->CrmConnection" drop-down and
select New Connection.

- Enter yours Dynamics CRM account credentials.
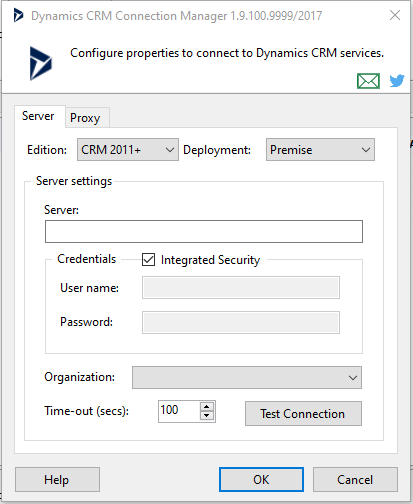
- Verify that connection is successful by pressing Test Connection button and save the Dynamics connection manager.
- Оpen Create Zoho Account REST Destination component, select Zoho Connection Manager from Connection drop-down and Account from Resource drop-down.

- Configure the mappings

- Save and build the DynamicsWebhook sample project.
Step 3. Create Dynamics Webhook after account is created
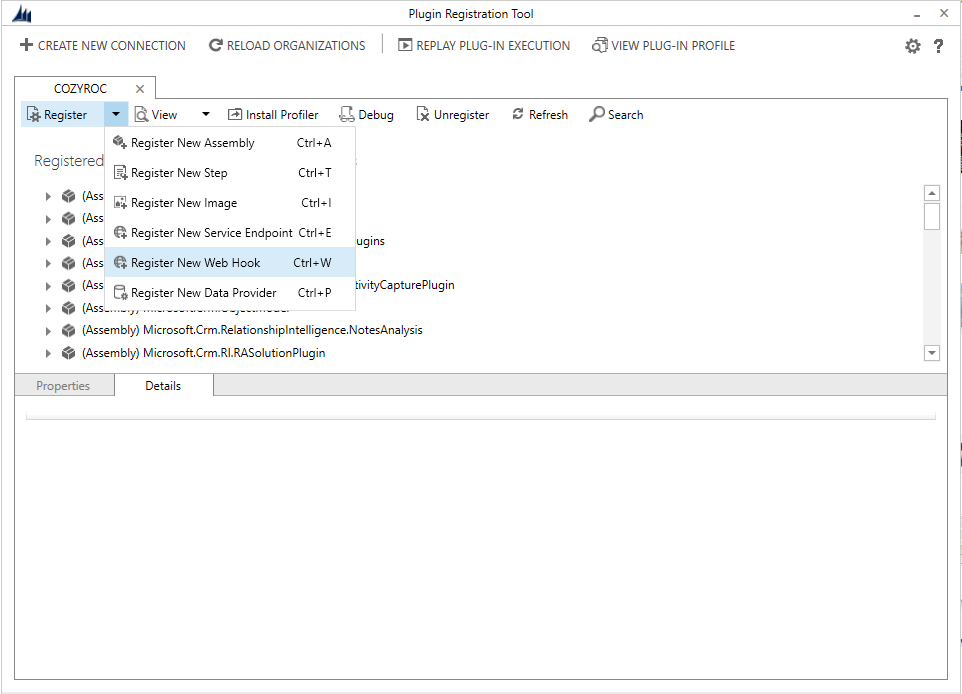
- Download and install on your local machine Plug-in Registration tool from here.
- Start Plug-in Registration tool and select Create new connection.
- Login into your Dynamics CRM account.

- Select Register then Register New Web Hook
- Registering new Webhook
5.1 Enter Webhook name.
5.2 Replace {{SSIS NoW Web Bridge address}} with the Web Bridge host address.
5.3 Authentication is mandatory for Webhook registration but not needed in our scenario, so just add one key/value pair with some values.
5.4 Click on Save button.

- Select Register then Register New Step.

- Registering new Step
7.1 Click on Message and select Create.
7.2 For Primary Entity select account.
7.3 For Event Handler select newly created Webhook from step 5.
7.4 Enter Step name.
7.5 Click on Register New Step button.

Optional
Step 4. SSIS NoW Web Bridge app is hosted locally behind router
- You have to assure that router's port on which Web Bridge app is listening is forwarded to the host machine internal IP address. Guide how to forward router's port you can find here
- You have to assure that port which Web Bridge app is using is open in Windows Firewall.
Guide how to open Windows Firewall port you can find here
In this quick-start we will setup a database trigger to automate Salesforce Account creation when a row is inserted in a SQL Server table.
Deploy the example files
Extract the downloaded archive and start the deploydemo.ps1 script. The files will be deployed in the default folder C:\SSIS NoW.

Provide Salesforce credentials
Open the provided package solution with the Microsoft Visual Studio. The solution file is located in C:\SSIS Now\SQLServerBridge\SalesforceCreateAccount\SaleforceCreateAccount.sln.
Open the SalesforceCreateAccount.dtsx package.
Fill your Salesforce credentials in the Salesforce Connection Manager 1 connection manager. Press the Test Connection button to ensure the credentials are correct.
Save the package and close the Visual Studio.

Create the example database
Open the Microsoft SQL Server Management Studio. Open the provided script to setup the SQL server and create the example database. The script is located in C:\SSIS Now\SQLServerBridge\setupdatabase.sql. Execute the script.

Insert record
Open the provided script with Microsoft SQL Server Management Studio to insert record in the example table. The script is located in C:\SSIS Now\SQLServerBridge\insert.sql. Execute the script.
After 2-3 seconds a new account in Salesforce will be created.

Detailed instructions and troubleshooting
Detailed instructions and troubleshooting guide is located in C:\SSIS Now\SQLServerBridge\Install and run SQL Bridge Example.md.
In this quick-start we will trigger SSIS package execution upon reading messages from a Kafka topic.
NOTE: Although the scenario functionally similar to continuous reading from Kafka via SSIS+ Message Queue Task Plus in a For Loop, SSIS NoW provides a more easily scalable and robust artchitecture
Prerequisites:
- Installed SSIS Plus
- Installed SSIS NoW
- Confluent account
- The demo archive now-kafka-bridge.zip
Step 1:
Extract the demo files in a folder on your PC.
Step 2:
- Create Confluent Cloud API key using this guide.
- On last step download the API key file and save it as
kafka.propertiesin the demo folder replacing the existing properties file. - Create a new topic in Confluent Cloud called
ssisnow.
Step 3:
- Open
ssis-now-config.xmlfrom the demo folder in your favorite text editor. - Change the connection string on line 4 to your SSIS NoW database connection string.
- Change the package path on line 15 to
Demo folder path\Factorial\FactorialJS.dtsxsubstituting with the folder path where you extracted the demo files.
Step 4:
- Run the
ssis-now-confluent-demo.ps1script in PowerShell. SsisNowConfigPathparameter - absolute path to thessis-now-config.xmlconfig fileSsisNowLogPathparameter - absolute path to a file to store SSIS NoW logs, e.g.Demo folder path\ssisnow.logKafkaConfigPathparameter - absolute path to thekafka.propertiesfileKafkaTopicparameter - the name of topic from Step 2ssisnowKafkaGroupIdparameter - consumer group id, usessisnowdemo- Wait until the script is ready. Two additional console windows will open for SSIS NoW and you should see a line
Waiting for events ...in the PowerShell output.
Step 5:
- Produce a new message in the
ssisnowtopic using this guide. - Use the following content for the message:
{"Argument":3,"ExpectedResult":6}. - In the PowerShell output you should see the message being consumed.
- In one of the SSIS NoW windows you should see the
FactorialJS.dtsxpackage being triggered.
Knowledge Base

COZYROC SSIS+ Components Suite is free for testing in your development environment.
A licensed version can be deployed on-premises, on Azure-SSIS IR and on COZYROC Cloud.